For my final project, I wanted to research into a technique for 3D Modelling that would allow me to hone skills needed for jobs in the industry. I undertook autonomous study and tests with feedback from my specialist tutor and produced a final set of assets for submission to demonstrate the skills I had learnt and which I could use in my portfolio.
By the end of the project I was able to produce a set of modular tiles with two props that could be used to construct environments. These assets used PBR Textures to produce renders of the assets as environments.
I felt that the research I undertook was thorough, and where it wasn’t, I was able to rectify this by listening to feedback from tutors. While I am pleased with the renders, the assets themselves are flawed and there is room for improvement, both in geometry, and texturing.
If I allocated more time for it, I would have produced a user guide that enabled the tiles that I created to be more user-friendly, as, currently, they have no directions on how to use them, and are used by me to create the environments that I did for my renders.
In a previous blog post, I mentioned wanting to add grime and texture to my assets, something I felt I did not achieve last year. This is also something I feel I missed out on accomplishing with these assets too, which, ultimately, leads to a very clean, flat looking scene in some areas. The quantity of props is something that I would have liked to improve upon also.
Thursday, 12 April 2018

Saturday, 7 April 2018
Modular Assets: Texturing
Having UV Unwrapped and modelled the assets that I want to texture, I took them into Substance Painter to texture. This software I have previously researched into, and conducted tests to use, but had never undertaken the task on assets that needed seamless textures, so this was a task that was new to me.
Overall I am disappointed with this stage, as I felt I didn't leave myself enough time for it and the phase was rushed. There were maps I didn't use, such as an opacity map, which would have made the tube props look more realistic in the final renders. However, I was pleased with the stone brick texture. Unsure of how to accomplish it in the program, I did not make any decals for the environment, which could have added the level of detail that would make the scene look less synthetic and clean.
 |
| Prop textured in Substance Painter |
 |
| Brick wall textured using a default material, and layered in Substance Painter to add grunge and grime effects. |
Friday, 6 April 2018
Modular Asset: Production
I have now produced 15 assets that are modular, as well as 2 props. The modular assets have been textured progressively, as I modelled the geometry to maintain a consistent texel resolution, as well as to ensure the assets tile the texture too.
This UV Unwrap ensures that Substance Painter materials arent warped or offset to the point they're no longer seamless in their texture.
The props I have produced are to reinforce the theme of modern, industrial elements being hidden among the old, decaying underground. While these still need to be unwrapped and textured, I want to ensure the environmental assets are complete first to allow the environments to be built for renders.
This UV Unwrap ensures that Substance Painter materials arent warped or offset to the point they're no longer seamless in their texture.
The props I have produced are to reinforce the theme of modern, industrial elements being hidden among the old, decaying underground. While these still need to be unwrapped and textured, I want to ensure the environmental assets are complete first to allow the environments to be built for renders.
Thursday, 5 April 2018
Modular Asset: Constraints
In looking at assets available on the asset store, I considered a poly limit that considers the fact that these assets will be used as modular, accumulating a larger amount of polys just from the construction of environments. Each asset that is used as an environmental piece is limited to 5k polys, which allows for geometry to be detailed enough to be of a professional standard, but lacks the 10k+ polys that I have seen from other props at industry standard.
As I am able to include more geometry in these assets, I have looked at reference material, and tried to add as much detail as I can to match these images. This includes things like using Substance Painter to paint calcium buildup caused by water damage, or using alpha maps to include hanging algae from the walls and edges of the floor.
As these are game assets, I am optimising as I model, and using textures that are placeholders to UV unwrap the assets. In my tests I have done, this ensures the best tiling from Substance Painter, when implementing the PBR Materials, however, I have experienced problems with Ambient Occlusion tiling improperly due to the nature of the atlas of textures. Any grime or effects added to the materials in Substance Painter need to be tilable too, otherwise the modular asset creates a seam, so this is something that I will need to consider as I continue
As I am able to include more geometry in these assets, I have looked at reference material, and tried to add as much detail as I can to match these images. This includes things like using Substance Painter to paint calcium buildup caused by water damage, or using alpha maps to include hanging algae from the walls and edges of the floor.
As these are game assets, I am optimising as I model, and using textures that are placeholders to UV unwrap the assets. In my tests I have done, this ensures the best tiling from Substance Painter, when implementing the PBR Materials, however, I have experienced problems with Ambient Occlusion tiling improperly due to the nature of the atlas of textures. Any grime or effects added to the materials in Substance Painter need to be tilable too, otherwise the modular asset creates a seam, so this is something that I will need to consider as I continue
Wednesday, 4 April 2018
Modular Asset: Pre-Production
Deciding upon using remaking my modular assets from last year, I retrieved what files I could from the project.
While the assets were still able to be used, the textures and modelling did not conform with the quality seen in professional portfolios I had looked at, or requirements cited from job listings.
Therefore, I decided to begin constructing and testing a new set of modular assets. These would have a high poly count than the previous ones, while using a texturing method that followed a PBR pipeline.
In terms of rendering, from my feedback during my presentation, and from the research into how different portfolios present their assets, I need to decide where appropriate to commit time to full, still image renders, and where to include real time rendering examples. Both I would like to include as my end deliverable. Props and assets that require evidence that I have textured and modelled them to the quality necessary to include in my porfolio would benefit from a turnaround, as this allows perspective employers to examine textures and modelling methods used, without having to open large, 3D Modelling programs.
While full renders I would like to use to show the skills I have gained in conveying mood within an environment, not just in creating assets, but how I am able to control the elements in these renders to create an atmosphere for the player who will explore them.
While the assets were still able to be used, the textures and modelling did not conform with the quality seen in professional portfolios I had looked at, or requirements cited from job listings.
Therefore, I decided to begin constructing and testing a new set of modular assets. These would have a high poly count than the previous ones, while using a texturing method that followed a PBR pipeline.
In terms of rendering, from my feedback during my presentation, and from the research into how different portfolios present their assets, I need to decide where appropriate to commit time to full, still image renders, and where to include real time rendering examples. Both I would like to include as my end deliverable. Props and assets that require evidence that I have textured and modelled them to the quality necessary to include in my porfolio would benefit from a turnaround, as this allows perspective employers to examine textures and modelling methods used, without having to open large, 3D Modelling programs.
While full renders I would like to use to show the skills I have gained in conveying mood within an environment, not just in creating assets, but how I am able to control the elements in these renders to create an atmosphere for the player who will explore them.
Tuesday, 3 April 2018
Modular Assets: Theming
My assets from last year used the setting of an underground sewer system for its theme and while I was happy with how they turned out, there is room for improvement which I would like to address.
Pipes
In my original piece, the pipes were a big disappointment, the texture being unrealistic and pixelated due to improper texel density compared the rest of the model. The pipes also could have had more variety in appearance to break up the monotony of the tiles.
Tiling capabilities
Unable to spend more time on them at a certain point, it was too late in the process that I realised some of the assets weren't tileable, so left minute gaps between geometry, while this was fixable with hiding the seams, I would rather the pieces were completely seamless, so as to avoid any unnecessary hiding of seams.
Pipes
In my original piece, the pipes were a big disappointment, the texture being unrealistic and pixelated due to improper texel density compared the rest of the model. The pipes also could have had more variety in appearance to break up the monotony of the tiles.
Tiling capabilities
Unable to spend more time on them at a certain point, it was too late in the process that I realised some of the assets weren't tileable, so left minute gaps between geometry, while this was fixable with hiding the seams, I would rather the pieces were completely seamless, so as to avoid any unnecessary hiding of seams.
Sunday, 11 March 2018
Rendering Method
Following my Presentation to my tutors, Chris mentioned using Real time Rendering Methods to show off the models I am making for the project. This would mean that less time would be taken to render the assets, but where I am still able to maintain the quality that I am looking to achieve.
This will require more research into doing this and does not eliminate the need for final renders. However, it ensures that I can lessen the time spent rendering, as this was something that I had allowed a lot of time for in my project milestones.
Next Step
I would like to research into tools for real time rendering, like Marmoset Toolbag and SketchFab, taking some assets that I used for testing and making an informed decision about using this method and whether it can be in lieu of renders in my portfolio
This will require more research into doing this and does not eliminate the need for final renders. However, it ensures that I can lessen the time spent rendering, as this was something that I had allowed a lot of time for in my project milestones.
Next Step
I would like to research into tools for real time rendering, like Marmoset Toolbag and SketchFab, taking some assets that I used for testing and making an informed decision about using this method and whether it can be in lieu of renders in my portfolio
Friday, 9 March 2018
Update on Deliverable
In preparation for the Final Project presentation, I pooled my renders and tests together to evaluate where I was in my project, and what still needed to be completed.
I have undertaken tests in Modelling, PBR texturing and Sculpting, to the point where I am comfortable about where these stages belong in my pipeline as well as how they differ to the traditional methods taught in my previous two years of 3D Modelling for games.
Looking at my milestones, I had planned, by this stage in the project, to be undertaking the PBR texturing phase, but have yet to begin this. Instead, I am still in the modelling phase, modelling my final deliverable.
For my final deliverable, I wanted to showcase the skills I had learned throughout the project, while displaying an understanding of how these methods are different to traditional methods. It is for this reason that I am working to remake my assets from the 3D Modular assets module from my second year. I feel that this allows me to demonstrate how I have improved my skills in this year, as well as providing me with the opportunity to use all these skills and display in my portfolio.
Thursday, 22 February 2018
Retopology
In my research into retopology methods, I found that there are more ways than using 3DS Max and the freeform tools.
ZBrush and Mudbox
ZBrush and Mudbox have automatic Retopology functions that can retopologise a sculpted object with customisation options to maintain certain topology in key areas of a model. For example, a face may need more focused topology than the body of a character. ZBrush has the option to PolyPaint to define areas that need double the amount of polys.
The problems I've found with this method is that the topology is still automated and the topology still has room for optimisation.
3DS Max Freeform tools
I found 3DS Max freeform tools ensured that I had more control over topology, but it was a very manual, time consuming method. However, it is still a viable method, but for my project, it would need to be taken into consideration the amount of time this method takes.
ZBrush and Mudbox
ZBrush and Mudbox have automatic Retopology functions that can retopologise a sculpted object with customisation options to maintain certain topology in key areas of a model. For example, a face may need more focused topology than the body of a character. ZBrush has the option to PolyPaint to define areas that need double the amount of polys.
The problems I've found with this method is that the topology is still automated and the topology still has room for optimisation.
3DS Max Freeform tools
I found 3DS Max freeform tools ensured that I had more control over topology, but it was a very manual, time consuming method. However, it is still a viable method, but for my project, it would need to be taken into consideration the amount of time this method takes.
 |
| Retopolgised Version of sculpt |
 |
| Baked Normal Map on retopologised model |
Sources
Knowledge.autodesk.com. (2016). Freeform Tab 3ds Max [online] Available at: https://knowledge.autodesk.com/support/3ds-max/learn-explore/caas/CloudHelp/cloudhelp/2016/ENU/3DSMax/files/GUID-2D8C6EFA-6073-4CCF-ABE7-E87FF6F0ADA0-htm.html [Accessed 8 Feb. 2018].
Mudbox Help (2014) [online] Available at: http://download.autodesk.com/global/docs/mudbox2014/en_us/index.html?url=files/GUID-3F981486-5AAD-44BA-B1B3-84B19DA50C1E.htm,topicNumber=d30e29698 [Accessed 7 Feb. 2018].
Mudbox Help (2014) [online] Available at: http://download.autodesk.com/global/docs/mudbox2014/en_us/index.html?url=files/GUID-3F981486-5AAD-44BA-B1B3-84B19DA50C1E.htm,topicNumber=d30e29698 [Accessed 7 Feb. 2018].
Friday, 2 February 2018
Modeling/Sculpting Stage
The first stage in my pipeline is the Modelling and sculpting stage. My initial research tested some modelling techniques, but as per my feedback, I looked at modelling a small asset to determine the order in which I would geometry model, and sculpt.
Because I chose, also, to reevaluate the Software I used for Sculpting, I have tested a few assets, rather than just one asset, to get an idea for the advantages and disadvantages of sculpting certain things. For example, Hard Surface Modelling in 3DS Max can require a lot of polys to avoid the default "sharp" edges, but is generally easier to accomplish compared to sculpting flat surfaces in ZBrush.
My tests aimed to:
The Kukri Knife took significantly longer to model in 3DS Max, but produced a model that needed no retopology and came in at a lower poly count than any of the ZBrush sculpts I produced.
The mountain used ZBrush entirely to model, handling retopology after the sculpting process. I found this process the most time consuming, but could understand the necessity of it for sculpting organic modelling in a short amount of time.
The method used for the pillar involved geometry modelling in 3DS Max, then sculpting onto this primitive mesh in ZBrush. The high poly model was then baked onto the original, low poly mesh using Substance Painter, reducing the poly count to under 1000 polys.
This method ensured that the geometry was never dramatically warped during the sculpting stage, but it would depend on the complexity of the geometry being produced in the final product.
There are also different methods of retopology, using different software, which I feel i can test in more depth, dedicating a post to just the findings from that.
Because I chose, also, to reevaluate the Software I used for Sculpting, I have tested a few assets, rather than just one asset, to get an idea for the advantages and disadvantages of sculpting certain things. For example, Hard Surface Modelling in 3DS Max can require a lot of polys to avoid the default "sharp" edges, but is generally easier to accomplish compared to sculpting flat surfaces in ZBrush.
 |
| Softer Edges in 3DS Max using Turbosmooth |
 |
| Kukri Knife modelled in 3DS Max to test Hard Surface Modelling Techniques |
 |
| Sculpt of Mountain in ZBrush, ready for retopology |
 |
| Pillar 3D Modelled in 3DS Max, then sculpted in ZBrush, and textured and baked in Substance Painter |
My tests aimed to:
- Determine which methods in the modelling stage would be the most efficient
- Which methods would also allow me to produce a quality of work that is portfolio-ready.
The Kukri Knife took significantly longer to model in 3DS Max, but produced a model that needed no retopology and came in at a lower poly count than any of the ZBrush sculpts I produced.
The mountain used ZBrush entirely to model, handling retopology after the sculpting process. I found this process the most time consuming, but could understand the necessity of it for sculpting organic modelling in a short amount of time.
The method used for the pillar involved geometry modelling in 3DS Max, then sculpting onto this primitive mesh in ZBrush. The high poly model was then baked onto the original, low poly mesh using Substance Painter, reducing the poly count to under 1000 polys.
This method ensured that the geometry was never dramatically warped during the sculpting stage, but it would depend on the complexity of the geometry being produced in the final product.
Next Step
These tests helped me to determine a workflow for this stage of the pipeline, so I would, therefore, like to stress test it. I have found that sculpting from scratch in ZBrush is not advisable with my current level of skill, and so these further tests will focus primarily on the Geometry modeling (3DS Max ) >Sculpting (ZBrush) > Baking/Retopology (Substance Painter)
There are also different methods of retopology, using different software, which I feel i can test in more depth, dedicating a post to just the findings from that.
Thursday, 1 February 2018
Sculpting Program
By undertaking this testing phase again, it gave me a chance to further investigate which of the two sculpting programs to use. Whereas I previously only had access to Autodesk Mudbox, now I had the chance to use ZBrush and compare the two.
Mudbox definitely used a more familiar layout that I was accustomed to, being part of the Autodesk Software. This meant there were a lot of shared traits with 3DS Max, and I had also learned my way around the software during the first few weeks of my project.
However, while ZBrush lacked this familiarity, it made up for this in the intricacy that it allowed one to sculpt. An array of brushes were available with precise settings for each brush, and any deformations and modifications one wished to make on the model.
Setting up Reference images was intuitive, integrated into the scene so that the sculpting was easily comparable to the source images at any point during the sculpt. This is in contrast to the limited projection settings provided by Mudbox.
In terms of learning this new software, ZBrush was the more popular among 3D Modelling forums and websites. The tutorials available were more in depth and plentiful, especially on Lynda.com, my preferred means of tutorials.
Mudbox definitely used a more familiar layout that I was accustomed to, being part of the Autodesk Software. This meant there were a lot of shared traits with 3DS Max, and I had also learned my way around the software during the first few weeks of my project.
However, while ZBrush lacked this familiarity, it made up for this in the intricacy that it allowed one to sculpt. An array of brushes were available with precise settings for each brush, and any deformations and modifications one wished to make on the model.
Setting up Reference images was intuitive, integrated into the scene so that the sculpting was easily comparable to the source images at any point during the sculpt. This is in contrast to the limited projection settings provided by Mudbox.
In terms of learning this new software, ZBrush was the more popular among 3D Modelling forums and websites. The tutorials available were more in depth and plentiful, especially on Lynda.com, my preferred means of tutorials.
Next Step
The test that I want to undertake makes use of the sculpting software, so after learning it, I would like like test some assets out in it to determine this area of the workflow I am wanting to follow. By doing this, I hope to assess whether it is preferable to sculpt from scratch in ZBrush, then retopologise, or to create a poly model in 3DS Max, then sculpt in ZBrush and return to 3DS Max to retopologise.
The method of retopology also needs addressing, as many programs are capable of doing it, but I need to figure out which is the most efficient, effective and professionally used, if applicable.
Sources
Munoz, P. (2018). Learning ZBrushCore. [online] Lynda.com - from LinkedIn. Available at: https://www.lynda.com/ZBrush-tutorials/Welcome/648907/690587-4.html?autoplay=true [Accessed 1 Feb. 2018].Tuesday, 19 December 2017
Feedback

Firstly, I may need to reconsider my final artifact, which I had felt may be over-scoped. Whereas my final artifact idea makes use of the hard surface modelling techniques, there is very little room for any organic modelling, which is cited as a requirement in a lot of job advertisements and so I would like to display this in my portfolio.
My feedback details a process I had not documented, using re topology tools and so I plan to use an asset I have previously modelled to take it through this pipeline as suggested. Any models used in the tests can be documented in my portfolio if they are to a high enough standard and, as suggested, could define what the final product would be, and its limitations a bit better.
Although I had considered using high poly sculpting to low poly sculpting, I thought I may be able to bake to a lower poly mesh, but had not accounted for any new geometry said sculpting creates, so this is a valuable method to be reiterating.
Sunday, 17 December 2017
Modelling Update
I've been looking at building an environment using Modular assets.
My first iteration of this was to build the modular assets so that they could be used to construct buildings for a town, or small city. The kind of environment seen in towns with pedestrian roads. I researched the different elements of buildings, and worked on splitting the buildings into ground floor models, and upper stories, so that a level designer could construct them at their ease to produce a wide variety of types, while still maintaining a consistent style.
The tests I produced demonstrate the ways that the buildings could be split up to be modular. This also provides me with a sense of the scale of the project. For example, how many polys the individual assets will be and how much they will amount to. This data was taken from sources
My first iteration of this was to build the modular assets so that they could be used to construct buildings for a town, or small city. The kind of environment seen in towns with pedestrian roads. I researched the different elements of buildings, and worked on splitting the buildings into ground floor models, and upper stories, so that a level designer could construct them at their ease to produce a wide variety of types, while still maintaining a consistent style.
The tests I produced demonstrate the ways that the buildings could be split up to be modular. This also provides me with a sense of the scale of the project. For example, how many polys the individual assets will be and how much they will amount to. This data was taken from sources
 |
| Modular Roofs. I researched into different types, and worked on fitting them together |
 |
| Very primitive examples of working out the pieces I could produce for the building |

 |
| Storefront that uses tileable ground floor and windows |

 |
| Experiment with using textures to pull out geometry for the model |
Thursday, 23 November 2017
Style Guide
A collection of images that I have gathered to hone down the style of building that I am hoping to produce. These images give me a good understanding of the different parts of the building I can split up and consider for the modular approach. For example, I could produce a variety of different cornices with different patterns and dentil placements which could seamlessly attach to a variety of building facades.


I have also researched into the specific parts of buildings, which will make it easier to search for specific photo reference and refer to conventions that actual buildings follow too.
 |
| Source: Nevin (2007) |


For aesthetics, I originally planned to theme it on the streets of Akihabara in Japan, which 'Cyberpunk' draws a lot of reference from. Using bright neon lights against a dark, blue toned backdrop for contrast. Where the signs on the side of buildings for advertisement were so plentiful, it seems like any available space is used for the signage. However, I wasn't too sure about if this would be possible in the time I had, having to model these assets, and devise a system of ensuring they fit together in a modular structure.
 |
| A collection of images highlighting the palette and recurring elements of 'cyberpunk' cities |
 |
| Images detailing a brassier sci-fi interior, showing more recurring elements of the genre. Hard surfaces, bright lights and rounder geometry than contemporary architecture. |
Sources
Nevin, S. (2007). Building Parts Diagram. [online] Gallery.insanart.com. Available at: http://gallery.insanart.com/v/design/buildingparts.jpg.html [Accessed 23 Nov. 2017].
Thursday, 16 November 2017
Poly Count for buildings
While trying to determine the poly count for the project I am undertaking, I considered how the entire project would need to be optimised to run in engine. The same thing would need to be considered if working in a AAA studio, and is cited as a requirement in most of the job advertisments I looked at.
Having decided on making a building using PBR texturing methods and utilising Polygon-sculpting methods, I looked at similar games. Considering I had looked at job adverts from Rockstar, I researched into the polygon counts seen in games like Grand Theft Auto V, Infamous Second Son. Games that use cities as their environment.
Another source I found is the Unreal Marketplace which, as the engine I am wanting to render the assets in, is useful in providing professional constraints for the work and also provides me with the means to sell my assets if I wanted to. This is a standard which ensures that assets are on par with the standards that are expected of the engine, and run in an optimised manner.
Finally, forums like PolyCount and 3D media companies like Turbosquid give some indications of the kind of poly count that is typical of certain games.
The spreadsheet below details an artist at Turbosquid's experiences with real-time poly counts. While a lot of the assets on Turbosquid reach exponential amounts of detail, the 'real time' assets represent a significantly downscaled version of what is normally offered, while still maintaining a lot of detail.
For my work, as I have decided on a modular building approach, I need to consider how much the count is going to increase, just from modularity alone. From the spreadsheet, it looks like I should be aiming for around 100k per asset, which also depends on the type of asset, and its position in the world in terms of importance, and likelihood of being seen and scrutinised by the player.
Sources
Google Docs. (2017). Poly Budgets 2017. [online] Available at: https://docs.google.com/spreadsheets/d/1xJmSuBZbdMOlIcdXmO9hu46GJ7-wIiWCclJwimIOJa4/edit#gid=0 [Accessed 16 Dec. 2017].
Epic Games. (2017). Marketplace Submission Guidelines[online] Available at: http://help.epicgames.com/customer/en/portal/articles/2592186-marketplace-submission-guidelines-preparing-your-assets#Submission Requirements [Accessed 16 Nov. 2017].
Nelva, G. (2014). inFAMOUS: Second Son's Characters are 120,000 Polygons; 11 Million Rendered Regularly by the Engine. [online] DualShockers. Available at: https://www.dualshockers.com/infamous-second-sons-characters-are-120000-polygons-11-million-rendered-regularly-by-the-engine/ [Accessed 24 Nov. 2017].
Having decided on making a building using PBR texturing methods and utilising Polygon-sculpting methods, I looked at similar games. Considering I had looked at job adverts from Rockstar, I researched into the polygon counts seen in games like Grand Theft Auto V, Infamous Second Son. Games that use cities as their environment.
Another source I found is the Unreal Marketplace which, as the engine I am wanting to render the assets in, is useful in providing professional constraints for the work and also provides me with the means to sell my assets if I wanted to. This is a standard which ensures that assets are on par with the standards that are expected of the engine, and run in an optimised manner.
Finally, forums like PolyCount and 3D media companies like Turbosquid give some indications of the kind of poly count that is typical of certain games.
The spreadsheet below details an artist at Turbosquid's experiences with real-time poly counts. While a lot of the assets on Turbosquid reach exponential amounts of detail, the 'real time' assets represent a significantly downscaled version of what is normally offered, while still maintaining a lot of detail.
For my work, as I have decided on a modular building approach, I need to consider how much the count is going to increase, just from modularity alone. From the spreadsheet, it looks like I should be aiming for around 100k per asset, which also depends on the type of asset, and its position in the world in terms of importance, and likelihood of being seen and scrutinised by the player.
Sources
Google Docs. (2017). Poly Budgets 2017. [online] Available at: https://docs.google.com/spreadsheets/d/1xJmSuBZbdMOlIcdXmO9hu46GJ7-wIiWCclJwimIOJa4/edit#gid=0 [Accessed 16 Dec. 2017].
Epic Games. (2017). Marketplace Submission Guidelines[online] Available at: http://help.epicgames.com/customer/en/portal/articles/2592186-marketplace-submission-guidelines-preparing-your-assets#Submission Requirements [Accessed 16 Nov. 2017].
Nelva, G. (2014). inFAMOUS: Second Son's Characters are 120,000 Polygons; 11 Million Rendered Regularly by the Engine. [online] DualShockers. Available at: https://www.dualshockers.com/infamous-second-sons-characters-are-120000-polygons-11-million-rendered-regularly-by-the-engine/ [Accessed 24 Nov. 2017].
Thursday, 2 November 2017
Update on Concepts and Level Design
Originally I wanted to outsource any level design so that I didn't have to spend necessary time on planning and greyboxing a level.
While I have been able to find different concept art that would benefit my project, I was unable to find any premade levels. However, I was able to find a lot of pre-prepared level maps that I could use use and change to fit with my desired scope and still keep in mind my stretch goal.
Using an existing layout of a city block, I was able to block out the geometry of the level using Unreal Engine 4 and while it is an extremely large project, it allowed me to tweak specific sections and view them 'in-game'
The biggest problem I face with using real-world maps and measurements is that, when viewed from either a third person person perspective, or first person perspective, the scale appears too small. This was a problem highlighted by Luke Ahearn in 3D Game Environments, where he makes reference to how racing games intentionally use massively wide roads to combat the limitation of racing in a two lane road.
In terms of concepts, I have gathered a variety of photo references, which I hope to reproduce using textures and modular construction and combining the two methods into a hybrid of modular assets and modular textures.


In terms of concepts, I have gathered a variety of photo references, which I hope to reproduce using textures and modular construction and combining the two methods into a hybrid of modular assets and modular textures.
 |
| City layout taken from Akihabara. Overall, it is a lot to individually 3D Model, but may be possible as a stretch goal, using modular assets. |


Wednesday, 18 October 2017
3D Modelling Techniques: Modular
[UE4] Modular Building Set Breakdown
The link above provides a thorough run through of a 3D Artist designing and building modular assets for buildings, which is something to consider for my Final project.
The artist makes a point of analysing photo reference to capture key elements of buildings that can be reused and re purposed, even detailing a method that allows for the colours to be switched using colour overlays in Unreal.
He uses PBR maps, using a workflow similar to a metallic/roughness workflow outlined by Allegorithmic Documentation (McDermott, 2015) Utilising Base Colour, Metallic, Specular and Roughness maps, each using inputs from 0 to 1.
Sources
Docs.unrealengine.com. (2017). Physically Based Materials. [online] Available at: https://docs.unrealengine.com/latest/INT/Engine/Rendering/Materials/PhysicallyBased/ [Accessed 18 Oct. 2017].
The link above provides a thorough run through of a 3D Artist designing and building modular assets for buildings, which is something to consider for my Final project.
The artist makes a point of analysing photo reference to capture key elements of buildings that can be reused and re purposed, even detailing a method that allows for the colours to be switched using colour overlays in Unreal.
He uses PBR maps, using a workflow similar to a metallic/roughness workflow outlined by Allegorithmic Documentation (McDermott, 2015) Utilising Base Colour, Metallic, Specular and Roughness maps, each using inputs from 0 to 1.
Sources
Docs.unrealengine.com. (2017). Physically Based Materials. [online] Available at: https://docs.unrealengine.com/latest/INT/Engine/Rendering/Materials/PhysicallyBased/ [Accessed 18 Oct. 2017].
McDermott, W. (2015). The Comprehensive PBR
Guide Vol. 2. 1st ed. [ebook] Allegorithmic. Available at:
https://www.allegorithmic.com/pbr-guide [Accessed 17 Oct. 2017].
Wednesday, 4 October 2017
Physically Based Rendering Workflow
There are two main workflows for PBR Shaders, depending on the engine capabilities or constraints. These are a Metal/Roughness workflow and a Specular/Glossiness workflow, each with their advantages, cruxes and map types.
Metal/Roughness
This workflow uses three map types that are exclusive to this pipeline, and each have their own guidelines on how to create them, as cited by Allegorithmic.
Base Colour
The base colour map is where the reflectance value is placed, with a reflected colour for dielectrics. The reflectance value works in hand with the metallic map, and will only reflect light if the metallic map masks the area as being metal.
For the base colour, no lighting information is present, and the tone of the colour is flatter than it would appear in a normal diffuse colour map. This considers the PBR Shader which will give the map a lighter appearance. On the sRGB scale, the tone of the base colour map should adhere to guidelines, depending on the brightness. If it is a darker colour, it shouldn’t go below the range of 30-50, while brighter values shouldn’t exceed 240. The dielectric value (F0) is hardcoded to 0.04 (4%) reflective.
The reflectance value uses real world values to give the desired look of certain metals. As stated before, any non-metallic elements, or dielectrics should be set to non-metallic in metallic map.
Metallic
Like an alpha mask, this map defines which areas of the texture are raw metal, and which aren’t. This map doesn’t take any real-world values, and uses black to define non-metals, and white for metals. A blend between the two states can be achieved by using grey values, but if they have a value lower than 235 sRGB, their reflectance value in the Base Colour map too needs to change to show it is no longer a metal.
Roughness
The roughness map determines the texture that the object is given, and how smooth the surface is. While the light intensity remains a constant, a rougher surface changes the direction that reflections follow, using the microfacet theory. A smoother surface will appear brighter, with less diffusion taking place. In a roughness map, Black represents a smooth surface, while white represents rough. As the other two maps rely heavily on real-world values, it is in this map that an artist can spread their wings, defining the character of the surface and telling whatever kind of story they want about the condition it is in. The normal map of an object usually features detail that can be used as a guideline to create a roughness map, defining key areas and details.
Energy conservation
As the Base Colour Map doesn’t give control over the F0 value for dielectrics, Specular values from Base Colour and Metallic map use real world values and maintain the laws of conservation, so the two values are additive.
Specular/Glossiness Workflow
Like the metallic/roughness workflow, this workflow uses three main maps:
Diffuse
This map contains the diffuse colour for the material but, unlike Base Colour, holds no reflectance values. Areas that are intended to display metal are coloured black, as they have no diffuse colour, and rust and grime would contain colour, as they are dielectrics. Like the Base Colour, it should contain no lighting information, but still adhere to the sRGB values for dielectrics, 30-50.
Specular
This map contains the reflectance values of metals, and the F0 values for dielectrics, where the F0 value is hardcoded at 4%, but should still follow real world measured values. The F0 value is greyscale, with the metal reflectance having colour. This colour is what gives the metal its tint that defines the type. For example, Gold has a yellower tint than steel.
Glossiness
Like the Roughness map, this creates surface irregularities that cause light to diffuse, and reflect less, giving a smoother, or rougher surface texture. Unlike the Roughness map, the values that denote smooth and rough are inverted, so Black defines rough, and white defines smooth.
Energy Conservation
Unlike the other workflow, Specular/Glossiness gives full control over f0 Values for dielectrics, which means the values for dielectrics and metals can combine to output a larger amount of light, breaking the laws of conservation.
Maps Common to both Workflows
Ambient Occlusion
Ambient Occlusion determines how much ambient environment light is available to the surface. So, faces that are hidden would contain no ambient environment light, and this would be presented in the ambient occlusion map. Ambient occlusion only impacts diffuse colour, and should not impact specular colour. Ambient Occlusion can be baked from the mesh itself, or from other maps, such as, Normal Maps and Height Maps.
Height
Often referred to as displacement maps, Height maps can be used in PBR for parallax mapping, and creates more depth than normal and bump maps. As with AO, Height maps can be baked from meshes themselves, or converted from Normal Maps.
Normal
Normal maps are used to create detail on surfaces, without needed to expend any polys to create the detail. In a PBR Workflow, it is used the same as in the traditional method, and is beneficial to be used to define the roughness/glossiness map. As the Height map can be defined using the Normal map, the same is true in reverse.
Metal/Roughness
This workflow uses three map types that are exclusive to this pipeline, and each have their own guidelines on how to create them, as cited by Allegorithmic.
- Base Colour
- Metallic
- Roughness
Base Colour
The base colour map is where the reflectance value is placed, with a reflected colour for dielectrics. The reflectance value works in hand with the metallic map, and will only reflect light if the metallic map masks the area as being metal.
For the base colour, no lighting information is present, and the tone of the colour is flatter than it would appear in a normal diffuse colour map. This considers the PBR Shader which will give the map a lighter appearance. On the sRGB scale, the tone of the base colour map should adhere to guidelines, depending on the brightness. If it is a darker colour, it shouldn’t go below the range of 30-50, while brighter values shouldn’t exceed 240. The dielectric value (F0) is hardcoded to 0.04 (4%) reflective.
The reflectance value uses real world values to give the desired look of certain metals. As stated before, any non-metallic elements, or dielectrics should be set to non-metallic in metallic map.
Metallic
Like an alpha mask, this map defines which areas of the texture are raw metal, and which aren’t. This map doesn’t take any real-world values, and uses black to define non-metals, and white for metals. A blend between the two states can be achieved by using grey values, but if they have a value lower than 235 sRGB, their reflectance value in the Base Colour map too needs to change to show it is no longer a metal.
Roughness
The roughness map determines the texture that the object is given, and how smooth the surface is. While the light intensity remains a constant, a rougher surface changes the direction that reflections follow, using the microfacet theory. A smoother surface will appear brighter, with less diffusion taking place. In a roughness map, Black represents a smooth surface, while white represents rough. As the other two maps rely heavily on real-world values, it is in this map that an artist can spread their wings, defining the character of the surface and telling whatever kind of story they want about the condition it is in. The normal map of an object usually features detail that can be used as a guideline to create a roughness map, defining key areas and details.
Energy conservation
As the Base Colour Map doesn’t give control over the F0 value for dielectrics, Specular values from Base Colour and Metallic map use real world values and maintain the laws of conservation, so the two values are additive.
Specular/Glossiness Workflow
Like the metallic/roughness workflow, this workflow uses three main maps:
- Diffuse (albedo)
- Specular
- Glossiness
Diffuse
This map contains the diffuse colour for the material but, unlike Base Colour, holds no reflectance values. Areas that are intended to display metal are coloured black, as they have no diffuse colour, and rust and grime would contain colour, as they are dielectrics. Like the Base Colour, it should contain no lighting information, but still adhere to the sRGB values for dielectrics, 30-50.
Specular
This map contains the reflectance values of metals, and the F0 values for dielectrics, where the F0 value is hardcoded at 4%, but should still follow real world measured values. The F0 value is greyscale, with the metal reflectance having colour. This colour is what gives the metal its tint that defines the type. For example, Gold has a yellower tint than steel.
Glossiness
Like the Roughness map, this creates surface irregularities that cause light to diffuse, and reflect less, giving a smoother, or rougher surface texture. Unlike the Roughness map, the values that denote smooth and rough are inverted, so Black defines rough, and white defines smooth.
Energy Conservation
Unlike the other workflow, Specular/Glossiness gives full control over f0 Values for dielectrics, which means the values for dielectrics and metals can combine to output a larger amount of light, breaking the laws of conservation.
Maps Common to both Workflows
Ambient Occlusion
Ambient Occlusion determines how much ambient environment light is available to the surface. So, faces that are hidden would contain no ambient environment light, and this would be presented in the ambient occlusion map. Ambient occlusion only impacts diffuse colour, and should not impact specular colour. Ambient Occlusion can be baked from the mesh itself, or from other maps, such as, Normal Maps and Height Maps.
Height
Often referred to as displacement maps, Height maps can be used in PBR for parallax mapping, and creates more depth than normal and bump maps. As with AO, Height maps can be baked from meshes themselves, or converted from Normal Maps.
Normal
Normal maps are used to create detail on surfaces, without needed to expend any polys to create the detail. In a PBR Workflow, it is used the same as in the traditional method, and is beneficial to be used to define the roughness/glossiness map. As the Height map can be defined using the Normal map, the same is true in reverse.
Tuesday, 26 September 2017
Physically Based Rendering Theories
The main aim of a Physically Based Rendering system, and what makes it different to other methods of texturing, is that it strives to create realism. Using lighting techniques that ‘treat light the way it behaves in the world’ (Gamer's Nexus 2015) and using key principles of physics, and how light interacts with matter, objects are given a ‘photo-realistic’ appearance.
Light Rays and Ray-Trace
Light is generated along ray-traces, which are generated from the camera viewing position, onto the scene. How the ray-traces interact with geometry and objects, determines how light behaves and what properties that object displays visually.
Distribution
When light hits an object, how that light reacts to the object denotes characteristics like, opacity, reflectiveness etc. The light is either reflected from the object, or refracted, meaning it passes through it to some degree.
Absorption and Scattering
Absorption
When the light is absorbed by an object the intensity changes into another form of energy, such as heat. In a PBR Shader, the rays themselves do not change, as they are just a representation of the path that the light must follow.
Scattering
Scattering refers to light entering an object, and ‘scattering’ before it is emitted back out. The intensity of the light doesn’t change, but the thickness denotes how much of the light is scattered inside the object.
Diffuse and Specular Reflections
Specular
Specular is the light that is reflected off a surface, and follows the law of reflection, as per the laws of physics. This means that the angle of incidence, the angle that the light hits the object, is equal to the angle of reflection. The light intensity remains the same, even on uneven surfaces.
Diffuse
A diffuse material allows light to enter an object, scattering the light directions before it is refracted out again, however, diffuse is absorbent, meaning that refracted light has a chance to be completely absorbed if it travels for too long. An object that has high light scattering properties, but low absorption, allowing light to pass through it, gives a translucent effect, like frosted glass.
Microfacet Theory
This theory suggests that a surface is made of small, scaled planar surfaces that reflect light, meaning that if these are irregular due to an uneven surface, the light that would’ve normally been reflected, is instead diffused. This gives a surface its rough, or smooth texture.
Colour
Colour is determined by light reflections, and which wavelengths are emitted by the object, and reflected.
BRDF
Bidirectional Reflectance Distribution Function or BRDF describes the reflectance properties of a Surface. For a BRDF to work, it must conserve energy, as per the laws of physics, and exhibit reciprocity.
Reciprocity Principle
Helmholtz reciprocity principle states that incoming and outgoing rays are reversals of each other, without affecting the outcome of the BRDF.
Energy Conservation
Following the physics of light in the real world, physically based rendering uses energy conservation, where the light reemitted from an object is less than what is received. Energy has been converted into other forms. Allegorithmic cites that this is handled in their PBR Shader, and isn’t necessary to adjust.
Fresnel Effect
This is the effect where the amount of light that is reflected off an object is dependent on the viewing angle. For example, viewing a pool of water from a perpendicular angle, the viewer would see straight through the water, depending on if it was clean or not. But as the viewer puts distance between themselves and the pool, their viewing angle changes, and so does the way that light is reflected at their eyes.
F0 (Fresnel reflectance at 0 degrees)
F0 is the amount of light that is reflected at a 0degree viewing angle, that is, at a straight on angle. In a PBR Shader, this value is given to non-metals (Dielectrics/Insulators) as opposed to metals (Conductors)
Conductors and Insulators (Metals and Non-Metals)
For Physically based rendering, there are set guidelines for metal and non-metal surfaces, with values that correspond to real life values.
Metals
Metals are good conductor of heat and electricity, and so light that hits a metal surface is reflected. All refracted light is absorbed. Any painted metals or rusted metals are treated as dielectrics, as they do not behave as metals do.
Non-Metals
Dielectrics are poor conductors of electricity, and so they reflect a smaller amount of light. Common dielectrics have an F0 value of between 2-5%
Linear Space Rendering
This means that intensity values are not corrected as post production volumes and so are proportionate to how they are perceived. This means that light behaves how it does in the real world, and so contributes to a photo-realistic look.
Sources
Gamers Nexus. (2015). What is PBR? Physically-Based Rendering Explained. [Online Video]. 13 March 2015. Available from: https://www.youtube.com/watch?v=7NjGETJMZvY. [Accessed: 18 October 2017].
Monday, 18 September 2017
Detailed Job Research
I have researched into environmental 3D Modelling jobs in an effort to identify key skills that are specific requirements to work in this area of the industry.
Blizzard

A strong sense of composition and eye for lighting, colour and detail
Attention to detail, and detailed modelling methods are needed with an artistic perspective in mind. Therefore, some knowledge on colour theory and using high quality images for textures to provide detail. This skill suggests the applicant should be able to demonstrate a knowledge of using these theories to design an atmosphere in an environment. To demonstrate that they an manipulate the mood of a scene, or render.
(Criterion Games, 2017)
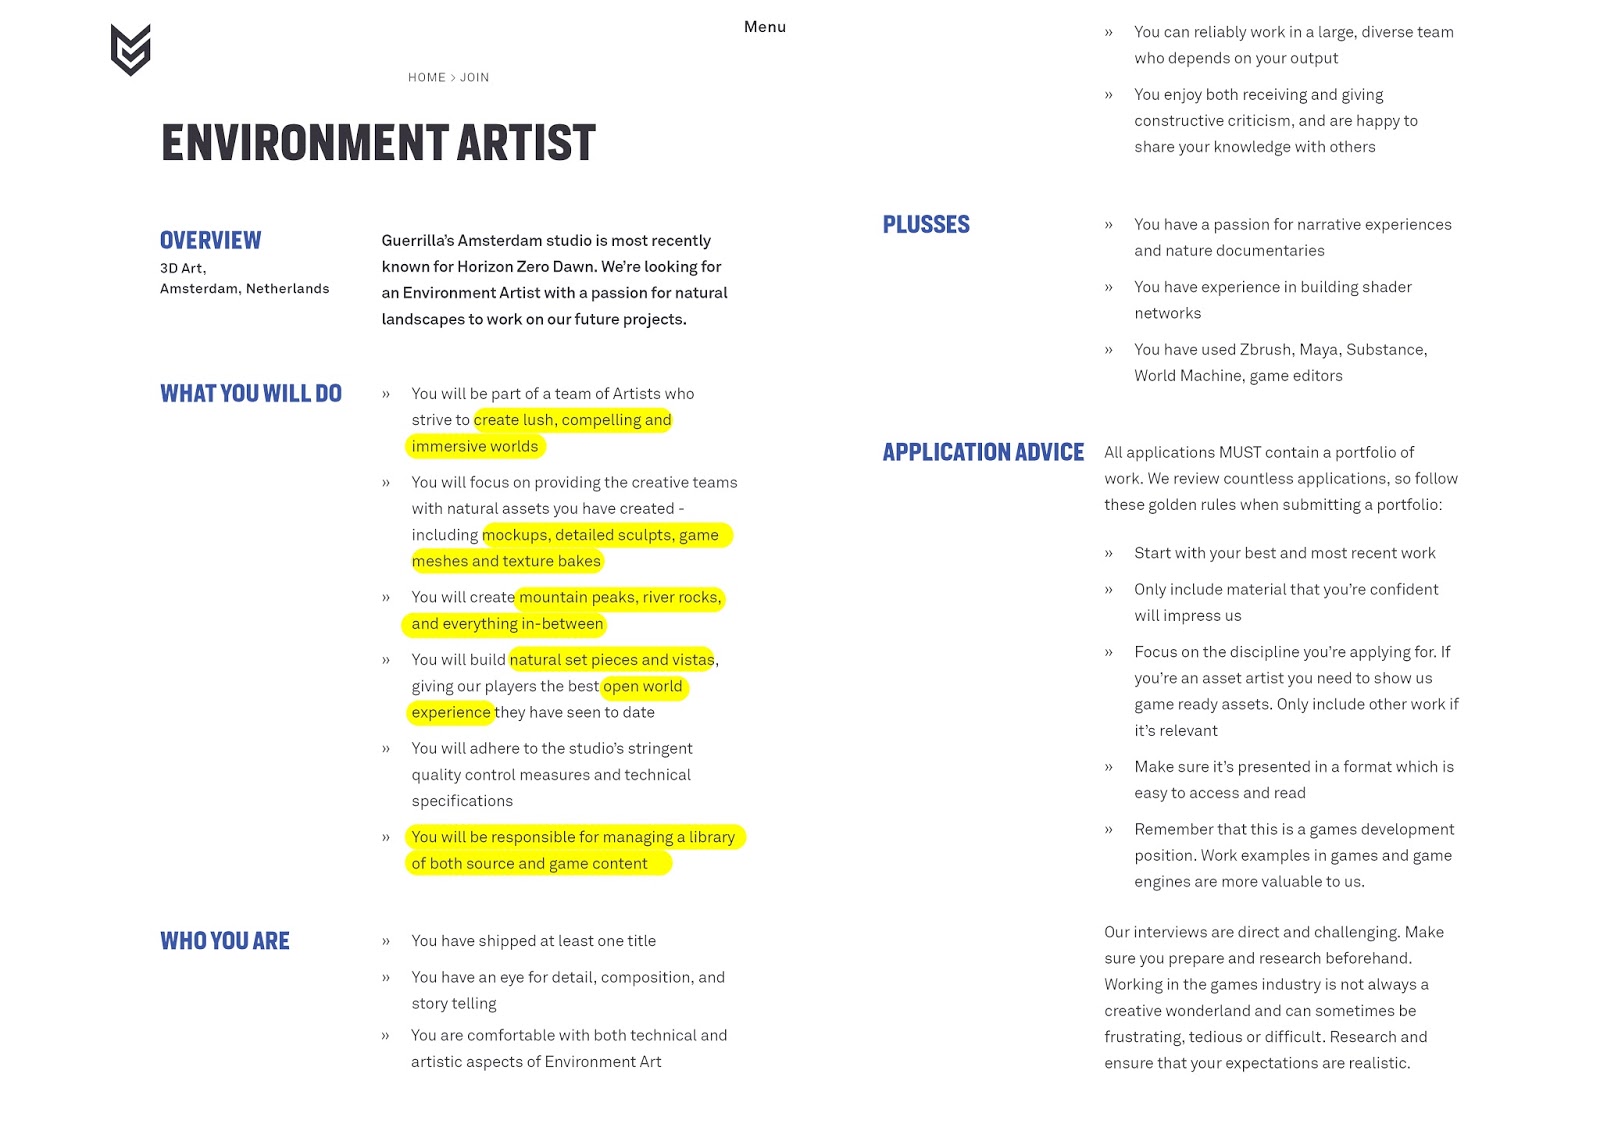
 Guerilla Games
Create Lush, compelling and immersive worlds
This requirement suggests that the company is using an engine that can handle the rendering/running of organic environment modelling, which generally requires high amounts of polys. This may also require detailed textures, using photo realism, or high poly-low poly baking.
Mockups, detailed sculpts, game meshes and texture bakes
This states the specific techniques expected of the modeller, which tallies with what the previous requirement calls for. The typical workflow they are expecting is also suggested, as high-poly to low-poly baking requires a specific order of work.
Mountain peaks, river rocks and everything in between/ natural set pieces
This shows a realistic style, using organic modelling, requiring sculpting knowledge. The engine capabilities are, again, hinted at, an 'Open World experience' meaning that the engine can obviously handle processing large, open world environments, so attention to detail is necessary. So maps like normal maps and grime maps may be required, or a knowledge of producing them.
Managing a library of both sources and game content
Not only is the prospective employee responsible for knowledge in these techniques, they are also expected to work professionally, and to have collated a collection of resources, both secondary and primary, to work with. Such as photo reference and photo manipulated textures they have produced themselves.

Ubisoft
Assist with optimisation and debugging
Shows optimisation techniques and knowledge is expected, so workflows using high poly to low poly baking is expected. Common XView Checks would also be expected in the workflow, and conserving the poly count.
Applicants should, again, have an eye for detail, which means they should be able to demonstrate this ,in their 3D Modelling and renders, showing high resolution texturing, that has used photo reference to maintain a consistent quality of assets, and uses PBR Systems to replicate real life lighting, and surfaces

Conclusion
Evident in all of these listings is the need for applicants to have knowledge of PBR Systems. Therefore, this is a definite skill that I need to display in my final project, and also need to go away and research extensively into.
Sculpting is another skill that is prevalent throughout the listing, which indicates the workflow that I should research and follow for my project. In some listings it explicitly states that the workflow of baking a high-poly mesh to low-poly mesh is necessary. So this is another absolute requirement for my final project that I need to be displaying.
Optimisation is cited a few times, particularity in the listings that pertain to open world, large environment construction. It doesn't state the exact constraints and limitations in place, so this is something I will need to explore further using my findings from: Optimisation in 3D Modelling However, this is definately something I need to convey in my final project, and consider throughout.
'Attention to detail, lighting and colour' was repeated a lot in these listings, which I found very vague and could have applied to many different aspects of 3D Modelling. However, I have chosen to interpret 'attention to detail' as Using photo-realistic images, and shading techniques, such as PBR shading, and sculpting/organic modelling to produce assets that are suitable to be used in a First-Person environment, maintaining geometry shape and texture resolution when viewed close up from this perspective. For 'lighting and colour' I intercepted this to mean that a 3D Modeler should knowledgeable in the theories of lighting and colour, and be capable of displaying assets that demonstrate this capability. For my final project, this could be achieved through market renders, or in-game renders that light scenes or assets in a variety of ways to achieve specific moods and atmospheres.
Blizzard
Fast and efficient 3D Modeller
This suggests a fast output time is needed from the 3D Modeller. This would mean that they would need sufficient knowledge of the tools to avoid any hindrances, and a workflow that was tried and perfected to produce a professional, consistent outcome each time
Superior eye for light, shade, and detail in creating texture maps and materials
This requirement outlines some skills that are needed from the artist. Firstly, knowledge and ability to texture and use materials with different maps. This would mean that this job isn't outsourced to another department, and so the qualities of a texture artist are needed. Attention to detail gives some indication of the quality they expect, probably not looking for stylised, hand drawn textures. More towards the photo-manipulation method of texture art.
Experience in Unity3D and Substance Painter
Both of these tools are capable of rendering PBR systems, so its likely this is a required skill. 'Superior eye for light, shade and detail' may also have been calling for a PBR workflow. Substance Painter is also used to bake different maps to lower poly meshes as a workflow for games.
(Blizzard, 2017)
(Blizzard, 2017)

Id Sotware - Bethesda
Create Models, textures and set pieces based on concept art
The artist will be working from reference material, and need to display the skills to interpret concepts that are most likely 2D Imagery into 3D models. It may also require communication between the modeller and the artist to achieve their vision, or to clarify aspects of the concepts that they may not be clear on.
Work closely with the lead, designers and other artists to model props and world builds
This ties back in with the previous skill of communicating between members of teams and different teams. It also suggests that your work is going to be transferred to different departments, and so needs to maintain consistent naming conventions and a clear, understandable workflow for members besides yourself. This responsibility also gives some scale to the projects you'd be undergoing, modelling on a world scale.
Familiarity with working on futuristic Hard surface Modeling
This gives the type of modelling that you'll be undertaking in this position, and the style and theme that you'll be emulating ; albeit a vague style and theme. Although it may be testing the modeler to display their skills in researching and informing an idea, demonstrating a wide variety of types of 'futuristic' themed assets.
Solid experience with world building, texturing and lighting inside a game editor such as Radiant, Unreal or comparable editor
From my research in the different 3D Modelling workflows, this sounds similar to a Level Design Workflow, making sure the assets are game ready, and replacing assets from greybox builds. Although not familiar with Radiant, I found that Unreal uses a renderer capable of rendering PBR systems, and this would be consistent with their statement at the top of the listing.
 |
| Comparison of DOOM gameplay, the final verison using id tech 6 with Dynamic lighting and Physically based rendering |
Understanding of modern 3D Modelling packages/ Familiarity with the id software family of engine, tools and material creation
This assumes the applicant has researched the company itself, but also gives some idea of what software is expected. Through some research, I found that the engine they use is: id tech 6, which uses a Physically based rendering system. (Bethesda, 2015) One of the skill requirements states: 'Solid experience in environment asset creation using contemporary, real time rendering methods' which shows what quality of work they are expecting, and how their company has designed their engine around this system.
(Zenimax Careers, 2017)

Criterion Games
Create high quality 3D environment art based off of concept art and photo reference
This requirement calls for the artist to actually be able to 3D Model geometry using concepts. This would mean working to a set scale, and an attention to detail. Possibly working with the concept artists tot achieve this goal. Again, this requirement calls for the ability to work from concepts, and explicitly states: from photo reference. They expect a photo-realistic appearance, that has the level of detail that a physically based rendering workflow would achieve.
Production techniques - High- low poly baking, modular asset creation, white boxing, physically based rendering, sculpting etc.
The company lists techniques they expect you to be familiar with, indicating that you would be working with sculpting and 'high poly' modelling, then baking to a lower poly mesh. This requires a knowledge of this workflow, and the individual skills that make it up.
Knowledge of tools
The company requires certain tools that are professional standard, which it is worth me investigating if I am not familiar with them.(Zenimax Careers, 2017)

Criterion Games
Create high quality 3D environment art based off of concept art and photo reference
This requirement calls for the artist to actually be able to 3D Model geometry using concepts. This would mean working to a set scale, and an attention to detail. Possibly working with the concept artists tot achieve this goal. Again, this requirement calls for the ability to work from concepts, and explicitly states: from photo reference. They expect a photo-realistic appearance, that has the level of detail that a physically based rendering workflow would achieve.
Production techniques - High- low poly baking, modular asset creation, white boxing, physically based rendering, sculpting etc.
The company lists techniques they expect you to be familiar with, indicating that you would be working with sculpting and 'high poly' modelling, then baking to a lower poly mesh. This requires a knowledge of this workflow, and the individual skills that make it up.
Knowledge of tools
A strong sense of composition and eye for lighting, colour and detail
Attention to detail, and detailed modelling methods are needed with an artistic perspective in mind. Therefore, some knowledge on colour theory and using high quality images for textures to provide detail. This skill suggests the applicant should be able to demonstrate a knowledge of using these theories to design an atmosphere in an environment. To demonstrate that they an manipulate the mood of a scene, or render.
(Criterion Games, 2017)

Create Lush, compelling and immersive worlds
This requirement suggests that the company is using an engine that can handle the rendering/running of organic environment modelling, which generally requires high amounts of polys. This may also require detailed textures, using photo realism, or high poly-low poly baking.
Mockups, detailed sculpts, game meshes and texture bakes
This states the specific techniques expected of the modeller, which tallies with what the previous requirement calls for. The typical workflow they are expecting is also suggested, as high-poly to low-poly baking requires a specific order of work.
Mountain peaks, river rocks and everything in between/ natural set pieces
This shows a realistic style, using organic modelling, requiring sculpting knowledge. The engine capabilities are, again, hinted at, an 'Open World experience' meaning that the engine can obviously handle processing large, open world environments, so attention to detail is necessary. So maps like normal maps and grime maps may be required, or a knowledge of producing them.
Managing a library of both sources and game content
Not only is the prospective employee responsible for knowledge in these techniques, they are also expected to work professionally, and to have collated a collection of resources, both secondary and primary, to work with. Such as photo reference and photo manipulated textures they have produced themselves.
Ubisoft
Assist with optimisation and debugging
Shows optimisation techniques and knowledge is expected, so workflows using high poly to low poly baking is expected. Common XView Checks would also be expected in the workflow, and conserving the poly count.
Applicants should, again, have an eye for detail, which means they should be able to demonstrate this ,in their 3D Modelling and renders, showing high resolution texturing, that has used photo reference to maintain a consistent quality of assets, and uses PBR Systems to replicate real life lighting, and surfaces

Conclusion
Evident in all of these listings is the need for applicants to have knowledge of PBR Systems. Therefore, this is a definite skill that I need to display in my final project, and also need to go away and research extensively into.
Sculpting is another skill that is prevalent throughout the listing, which indicates the workflow that I should research and follow for my project. In some listings it explicitly states that the workflow of baking a high-poly mesh to low-poly mesh is necessary. So this is another absolute requirement for my final project that I need to be displaying.
Optimisation is cited a few times, particularity in the listings that pertain to open world, large environment construction. It doesn't state the exact constraints and limitations in place, so this is something I will need to explore further using my findings from: Optimisation in 3D Modelling However, this is definately something I need to convey in my final project, and consider throughout.
'Attention to detail, lighting and colour' was repeated a lot in these listings, which I found very vague and could have applied to many different aspects of 3D Modelling. However, I have chosen to interpret 'attention to detail' as Using photo-realistic images, and shading techniques, such as PBR shading, and sculpting/organic modelling to produce assets that are suitable to be used in a First-Person environment, maintaining geometry shape and texture resolution when viewed close up from this perspective. For 'lighting and colour' I intercepted this to mean that a 3D Modeler should knowledgeable in the theories of lighting and colour, and be capable of displaying assets that demonstrate this capability. For my final project, this could be achieved through market renders, or in-game renders that light scenes or assets in a variety of ways to achieve specific moods and atmospheres.
Sources:
Bethesda Softworks (2015). Powering DOOM with id Tech 6. [video] Available at: https://www.youtube.com/watch?time_continue=16&v=R6itJ19T99c [Accessed 18 Sep. 2017].
Careers.blizzard.com. (2017). Environment Artist, Unannounced Project - Art/Animation/Sound. [online] Available at: https://careers.blizzard.com/en-gb/openings/opS25fw8 [Accessed 18 Sep. 2017].
Criterion Games. (2017). Environment Artist – Contract. [online] Available at: http://criteriongames.com/environment-artist-contract/ [Accessed 18 Sep. 2017].
Guerrilla-games.com. (2017). Environment Artist. [online] Available at: https://www.guerrilla-games.com/join/environment-artist [Accessed 18 Sep. 2017].
Ubisoft.com. (2017). Ubisoft - Careers / Search for Jobs. [online] Available at: https://www.ubisoft.com/en-us/careers/search.aspx#sr-post-id=743999660515827&is-redirect=true [Accessed 18 Sep. 2017].
ZeniMax Careers. (2017). ZeniMax Careers - Environment Artist - id Software. [online] Available at: https://jobs.zenimax.com/requisitions/view/1039 [Accessed 18 Sep. 2017].
Subscribe to:
Posts (Atom)